2. Jupyter Notebook Environment#
We are going to use Jupyter Notebooks intensively in this course. Jupyter Notebook is an important part of the Python ecosystem and is widely used by the data science and machine learning community for its capability of combining code and notes together. As an alternative, you can use Google Colab, which is actually also a Jupyter Notebook. This chapter provides a comprehensive overview of the Jupyter Notebook system, including how to install it, how to use it effectively, and how to navigate its environment.
Note
Some prefer to use Anaconda to manage Jupyter Notebook. We use the Python package installer pip for simplicity and better project control. The popular IDE VS Code can also run Jupyter Notebook, but the user experience is different and we will use Jupyter Notebook in this course.
The best way to install and configure Jupyter Notebook is to create a Python virtual environment. To do that, we need to use the Command Line Interface (CLI) in the computer. To install and start using Jupyter Notebook, follow the four steps below:
Install Python
Create Project directory
Create and enable a Python virtual environment (.venv)
Start using Jupyter Notebook
2.1. Python installation#
In this course, we will use Python 3.12.2 because we want to use an autograder in Jupyter Notebook to give you some instant feedback on your answers to some of the questions. It is not uncommon for an OS to have multiple Python installations so you may install different versions of Python in your computer.
2.1.1. Check Python Version#
Let us check what version(s) of Python are installed in your computer already.
Windows does not ship with a Python version by default. However, since Python is widely used, your computer may already have some versions of Python installed. We use the Windows Python Launcher (py.exe) and the where python command at the Command Prompt (cmd.exe) to see the current Python installation(s) (here I have a version 3.12 installed already):
C:\Users\[user]\AppData\Local>py -0
 -V:3.12*          Python 3.12 (64-bit)

C:\Users\[user]\AppData\Local>where python
C:\Users\[user]\AppData\Local\Programs\Python\Python312\python.exe
If you are using macOS, you already have a version of Python shipped with the OS. You may issue the following commands in the command line (using Terminal.app) to see the version(s) of Python you have in the current system. In most cases, you may need to use python3 instead of python. Also, which python3 will give you the path of the Python executable.
[user]@[host]:~/workspace/dsm$ python3 --version
Python 3.12.2
[user]@[host]:~/workspace/dsm$ which python3
/Library/Frameworks/Python.framework/Versions/3.12/bin/python3
[user]@[host]:~/workspace/dsm$
2.1.2. Install Python#
If the check above does not yield any results, or if you don’t see Python 3.12.2, go to python.org and download the installer of the specific version and install it. If you are on macOS, after installation, check to see if the intended version is installed using python2 or python.
$ python3
Python 3.12.10 (main, May 22 2025, 21:57:53) [Clang 14.0.0 (clang-1400.0.29.202)] on darwin
Type "help", "copyright", "credits" or "license" for more information.
>>>
If you are a Windows user, the situation is a little involved. When you search for Python from the Windows search bar, by default it will bring you to Windows Store for the current version of Python. However, the path of the Python installed will not be added to the PATH environment variable. It is therefore recommended to download the Python installer from python.org for installation.
If you installed Python through Windows Store, the installation runs through automatically. After installation, we check the installation using where python again and we see that there is a new entry at different path.
C:\Users\[user]> where python
C:\Users\[user]\AppData\Local\Programs\Python\Python312\python.exe    ### python.org installer installation
C:\Users\[user]\AppData\Local\Microsoft\WindowsApps\python.exe        ### Windows Store installation
We can check the newly installed Python version by going into the location and run python executable to see the version.
cd \Users\[user]\AppData\Local\Microsoft\WindowsApps
C:\Users\[user]\AppData\Local\Microsoft\WindowsApps>.\python.exe
Python 3.13.7 (tags/v3.13.7:bcee1c3, Aug 14 2025, 14:15:11) [MSC v.1944 64 bit (AMD64)] on win32
Type "help", "copyright", "credits" or "license" for more information.
>>>
Since Python3.12.2 is an earlier version, installing it by downloading the Python installer from python.org is preferred. Just go to the download section of the site, search for the desired version, and download the installer and double-click to start the installation. Make sure that you check the options below when installing:
Use admin privileges when installing py.exe
Add python.exe to the PATH environment variable
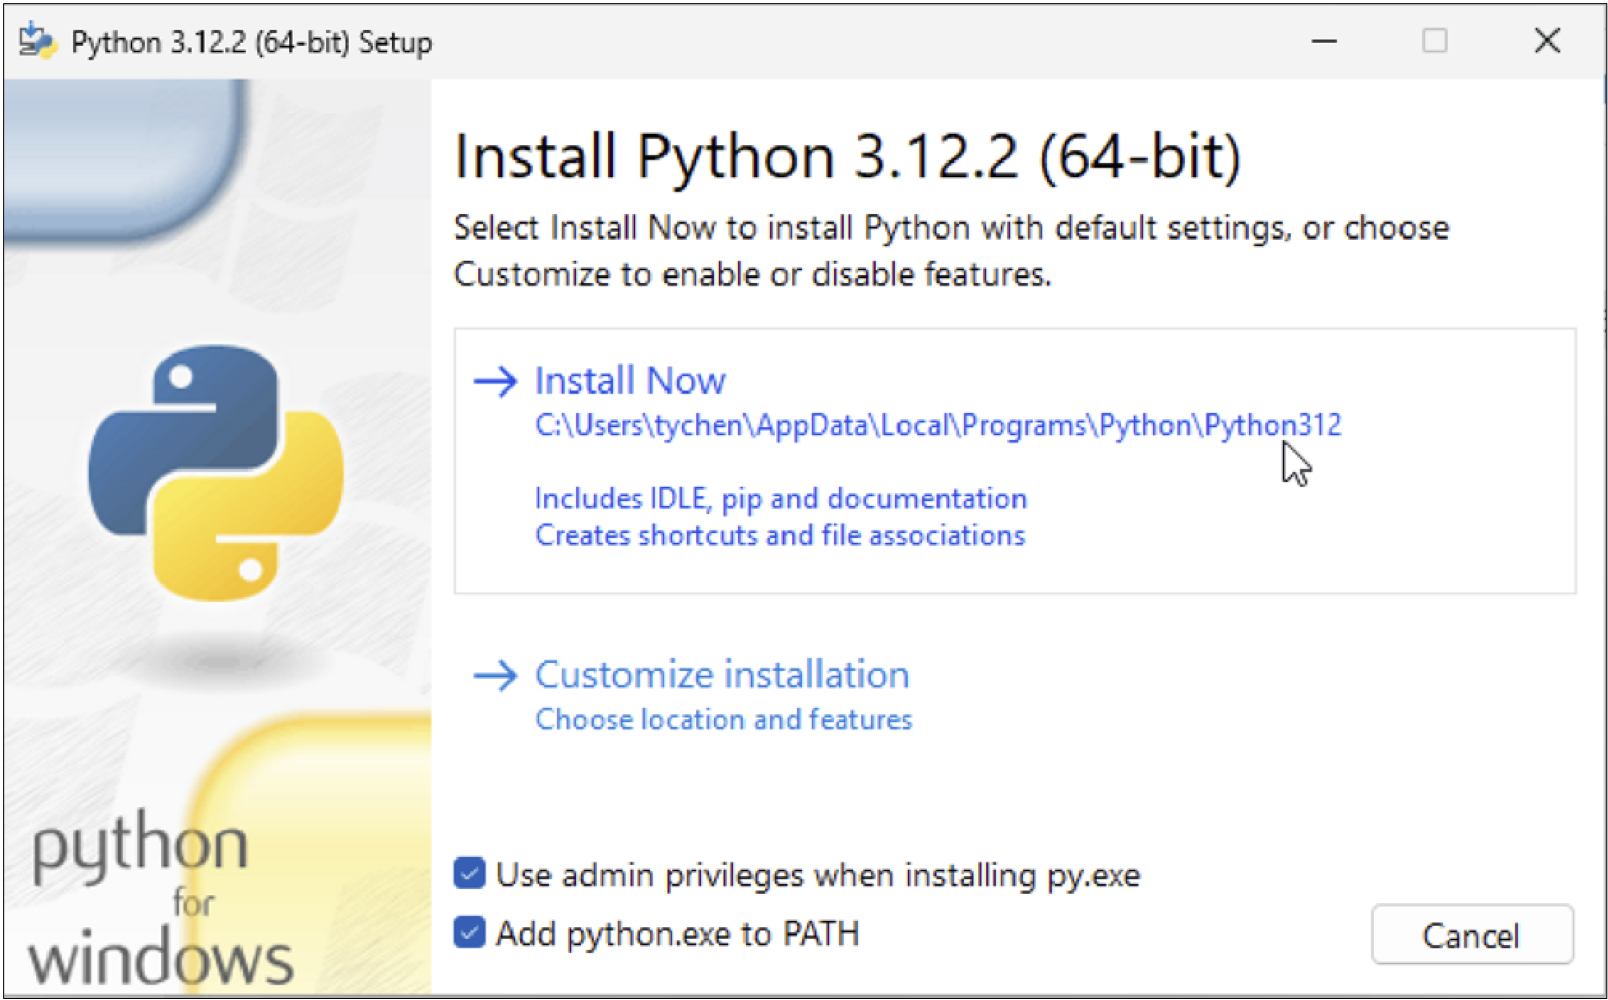
Fig. 2.1 Python Installation Options in Windows#
After completing the installations, you may check the Python installations you have using Windows Command Prompt:
PS C:\Users\[user]> py -0
 -V:3.13 *        Python 3.13 (64-bit)    ### if you use py launcher this is the default python
 -V:3.13-arm64    Python 3.13 (Store)
 -V:3.12          Python 3.12 (64-bit)
PS C:\Users\[user]>
In Command Prompt, you may see:
C:\Users\[user]>where python
C:\Users\[user]\AppData\Local\Programs\Python\Python313\python.exe
C:\Users\[user]\AppData\Local\Programs\Python\Python312\python.exe
C:\Users\[user]\AppData\Local\Microsoft\WindowsApps\python.exe
2.1.3. Choose Python Version#
In case we have more than one Python version installed, we may need to control the version of Python that we use. If the default Python is different from the desired version, you may use the version suffixes to designate the desired Python version.
In Windows, you may use the Python launcher to decide which Python version to use. This means, instead of issuing the python command, you use py -Major.Minor to control which Python version to use. For example, to use version 3.12, we issue:
C:\Users\[user]>py -3.12
Python 3.12.2 (tags/v3.12.2:6abddd9, Feb  6 2024, 21:26:36)
[MSC v.1937 64 bit (AMD64)] on win32
Type "help", "copyright", "credits" or "license" for more information.
>>>
In macOS, we append the Python version number in the format of Major.Minor when issuing python to choose the Python version to use:
$ python3.12
Python 3.12.2 (v3.12.2:6abddd9f6a, Feb  6 2024, 17:02:06)
[Clang 13.0.0 (clang-1300.0.29.30)] on darwin
Type "help", "copyright", "credits" or "license" for more information.
>>>
You can also change the system default Python version for python by moving the path of the desired version of Python to the top of the path list (restarting the computer may be needed). In Windows, to do that, you search for Edit environment variables for your account -> Environment Variables…, and in User variable for [user] (you may choose the System variables if preferred), choose Path -> Edit to bring up the window for editing the environment variable entries. In this example, Python 3.12 is moved to the top of the list.
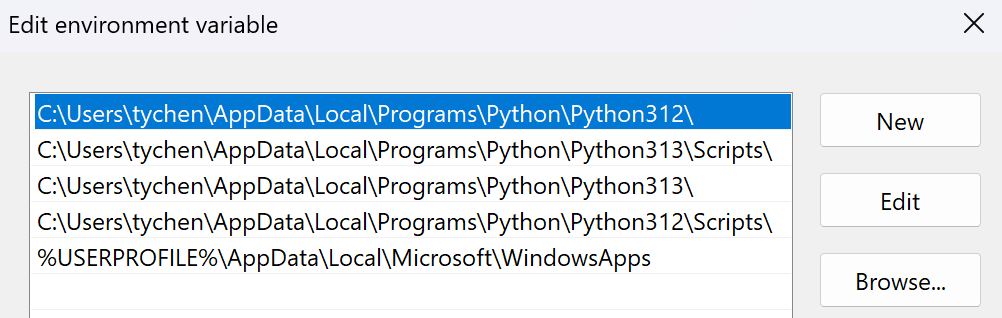
Fig. 2.2 The top Python path is the default Python#
This will point python to our desired version:
PS \\Users\[user]> python
Python 3.12.2 (tags/v3.12.2:6abddd9, Feb  6 2024, 21:26:36)
[MSC v.1937 64 bit (AMD64)] on win32
Type "help", "copyright", "credits" or "license" for more information.
>>>
If you are using macOS, then you may set an alias in one of your profile files (such as ~/.bashrc or ~/.profile) by adding the line to one of the files:
alias python='python3.12'
2.2. Creating Project Directory#
In general, when we create a project, it means we are creating a folder/directory. To use a project directory, we use the CLI of your OS. Since they are CLI rather than GUI, we need to use commands to achieve this. Although this can be done with a file manager (GUI), knowing how to use the CLI is a good skill set to have in the long run. The three shell commands that we use here are: ls (“list storage”), cd (“change directory”), and mkdir (“make directory”).
For the purpose of this course, we want to create a workspace directory inside your user home directory, and a dsm directory inside the workspace directory.
Note that macOS and Linux use forward slash for directory separator, while Windows use backward slash as separator but can also interpret forward slashes.
We use PowerShell as our CLI here because the syntax is more friendly.
PS C:\Users\[user]> mkdir workspace
    Directory: C:\Users\[user]
Mode                 LastWriteTime         Length Name
----                 -------------         ------ ----
d-----         8/31/2025   3:14 AM                workspace

PS C:\Users\[user]> cd workspace
PS C:\Users\[user]\workspace> mkdir dsm
    Directory: C:\Users\[user]\workspace
Mode                 LastWriteTime         Length Name
----                 -------------         ------ ----
d-----         8/31/2025   3:14 AM                dsm

PS C:\Users\[user]\workspace> cd dsm
PS C:\Users\[user]\workspace\dsm>
Use Terminal.app as CLI here for this task.
[user]@[host]ː~$ mkdir workspace
[user]@[host]ː~$ cd workspace
[user]@[host]ː~/workspace$ mkdir dsm
[user]@[host]ː~/workspace$ cd dsm/
[user]@[host]ː~/workspace/dsm$
After issuing the above commands, you will have a project directory (dsm) inside the workspace directory, and your current location is inside the dsm project directory.
2.3. The Virtual Environment#
While you are in the dsm project directory, we will create a Python virtual environment for the project. This means that we are going to place all packages (dependencies) we use in the virtual environment instead of installing the dependencies in the system Python, which is prone to conflicts. To install the packages in the project virtual environment also means that we are making this environment portable, meaning we can replicate the dependencies in another project or device. In addition to the installed project, the virtual environment also contains a link to the desired Python.
To create the virtual environment for the project, we issue the command as python -m venv .venv, in which python is the default desired version of Python, -m means module, venv is the module that creates virtual environment, and .venv, as a convention, is the name of the project virtual environment. The syntax for creating a Python virtual environment is:
python -m venv <environment_path_and_name>
Since we want to control which version of Python to use (3.12 in this case), we will use the version suffix by issuing py -3.12 -m venv .venv (Windows) or python3.12 -m venv .venv (macOS):
We use PowerShell here because the syntax is more friendly.
PS C:\Users\[user]\workspace\dsm> py -3.12 -m venv .venv
PS C:\Users\[user]\workspace\dsm> ls
    Directory: C:\Users\[user]\workspace\dsm
Mode                 LastWriteTime         Length Name
----                 -------------         ------ ----
d-----         8/31/2025   3:36 AM                .venv
PS C:\Users\[user]\workspace\dsm> ls
    Directory: C:\Users\[user]\workspace\dsm
Mode                 LastWriteTime         Length Name
----                 -------------         ------ ----
d-----         8/31/2025   3:36 AM                .venv
Use Terminal.app for this task.
[user]@[host]ː~/workspace/dsm$ python3.12 -m venv .venv
[user]@[host]ː~/workspace/dsm$ ls -a
.     ..    .venv
[user]@[host]ː~/workspace/dsm$
Using the command ls, we see that the virtual environment .venv folder is created.
Make sure you are using PowerShell as your CLI here. If you are using Command Prompt, issue dir instead of ls to list files.
PS C:\Users\[user]\workspace\dsm> ls
    Directory: C:\Users\[user]\workspace\dsm
Mode                 LastWriteTime         Length Name
----                 -------------         ------ ----
d-----          9/4/2025   9:41 PM                .ipynb_checkpoints
d-----          9/4/2025   9:41 PM                .venv
In macOS, using ls you will not see the .venv folder because file and directory names beginning with a dot are hidden. To see the .venv virtual environment in macOS, add the -a option to the ls command: $ ls -a.
[user]@[host]ː~/workspace/dsm$ ls -a
.                       .venv                   labs                    test.ipynb
..                      assignments_grading     NumPy                   test.py
.DS_Store               data                    numpy_arrays.ipynb
Inside the .venv virtual environment directory, there is a lib/Lib directory containing a folder called site-packages, which is where all the packages will be installed. project installation would go into.
In Windows, the site-packages looks like below. So far we only have pip but every package you install will come here and soon the list will be long.
PS C:\Users\[user]\workspace\dsm> ls .venv\lib\site-packages\
    Directory: C:\Users\[user]\workspace\dsm\.venv\Lib\site-packages
Mode                 LastWriteTime         Length Name
----                 -------------         ------ ----
d-----         8/31/2025   3:36 AM                pip
d-----         8/31/2025   3:36 AM                pip-24.0.dist-info
In macOS, the site-packages folder looks like below. So far we only have pip but every package you install will come here and soon the list will be long.
[user]@[host]ː~/workspace/dsm$ ls .venv/lib/python3.12/site-packages/
pip                pip-24.0.dist-info
2.4. Activating venv#
To activate your virtual environment, in the CLI, make sure you are in the project directory and type the following command to activate the project virtual environment. After the virtual environment is activated, a prefix (“(.venv)”) will be present in front of the CLI prompt.
[user]@[host]ː~/workspace/dsm$ source .venv/bin/activate
(.venv) [user]@[host]ː~/workspace/dsm$
PS C:\Users\[user]\workspace\dsm> .\.venv\Scripts\activate
(.venv) PS C:\Users\[user]\workspace\dsm>                 ### Windows
When the virtual environment is successfully activated, you will see (.venv) appears before the shell’s prompt line, which tells us the virtual environment is activated, we are using the designated version of Python, and that all the packages installation will go into the site-packages directory.
Obviously, after you are done with working on the project, you need to deactivate the virtual environment so that you would not install dependencies intended for other projects to this virtual environment. To do that, use the deactivate command (you can deactivate a virtual environment anywhere; it does not have to be in the project folder):
(.venv) PS C:\Users\[user]\workspace\dsm> deactivate
PS C:\Users\[user]\workspace\dsm>
(.venv) [user]@[host]:~/workspace/dsm$ deactivate
[user]@[host]:~/workspace/dsm$
2.5. Installing Jupyter Notebook#
Once you have a virtual environment, you can start installing the Python packages in it. For package installation, Python has a package manager pip (Pip Installs Packages). pip installs Python packages from the package repository Python Package Index (PyPI), where Python developers consume and distribute packages. To install a Python package using pip, the syntax is `pip install [package]’. To install Jupyter Notebook, you issue the command below with virtual environment enabled:
(.venv) PS C:\Users[user]\workspace\dsm> pip install notebook
Collecting notebook
Using cached notebook-7.4.5-py3-none-any.whl.metadata (10 kB)
Collecting jupyter-server<3,>=2.4.0 (from notebook)
…
(.venv) [user]@[host]ː~/workspaces/dsm$ pip install notebook
Collecting notebook
Downloading notebook-7.2.2-py3-none-any.whl (10.5 MB)
Collecting jupyterlab-server!=2.10.0,>=2.3.0
Downloading jupyterlab_server-2.25.1-py3-none-any.whl (58 kB)
…
2.6. Using Jupyter Notebook#
The Jupyter Notebook system is a powerful tool for interactive coding and note-taking. Instead of using proprietary tools such as Tableau or Power BI, it is now common for data scientists to use Python and Jupyter Notebook to integrate many other tools for data science tasks.
2.6.1. Launch Jupyter#
To open a Jupyter Notebook, go to your project folder in PowerShell (Windows) or Terminal (macOS) CLI, and type the following command and press Enter (with the venv activated):
(.venv) PS C:\Users[user]\workspace\dsm> jupyter notebook
(.venv) [user]@[host]ː~/workspaces/dsm$ jupyter notebook
This command will launch Jupyter Notebook in your default browser and a CLI showing the Notebook server processes. When you launch Jupyter Notebook, it opens the Home page in your browser. Navigate the Jupyter Notebook Homepage and you will see the URL “http://localhost:8888/tree ” in the address bar.

Fig. 2.3 A new Jupyter Home page#
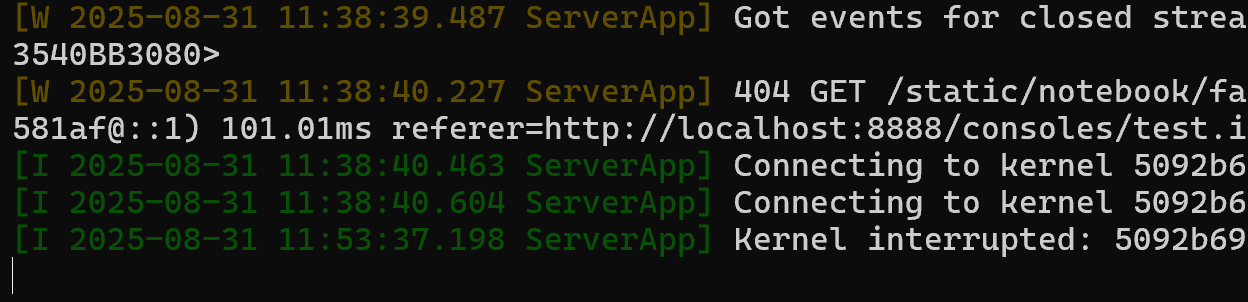
Fig. 2.4 The Jupyter Notebook server#
2.6.2. Create New Notebooks#
To create a new notebook, click the ‘New’ button on the upper right corner of the Jupyter Home page and select the desired Python environment (Python3 (ipykernel)). This will give you a new untitled notebook in a new browser tab. The new notebook will have a title called “Untitled” by the Jupyter sign at the top of the browser tab. To rename a notebook, click on the title (i.e., ‘Untitled’) and enter a new name, e.g., test. Do not remove the extension name.
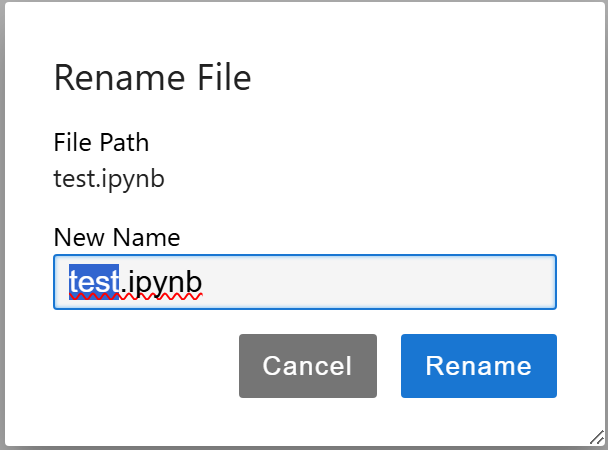
Fig. 2.5 Renaming a Jupyter Notebook#
After renaming the notebook, you can go back to the Jupyter Home tab and refresh the tab to see that Untitled.ipynb becomes test.ipynb.
2.6.3. Code Cells#
Jupyter Notebooks use code cells to execute Python code. By default, a new cell is a code cell. For example, to print a message in our test.ipynb, you issue:
print("hello world")
hello world
You can highlight and execute a cell by clicking on the ‘Run’ icon or simply by using the keyboard shortcut Shift+Enter. The output appears below the cell.
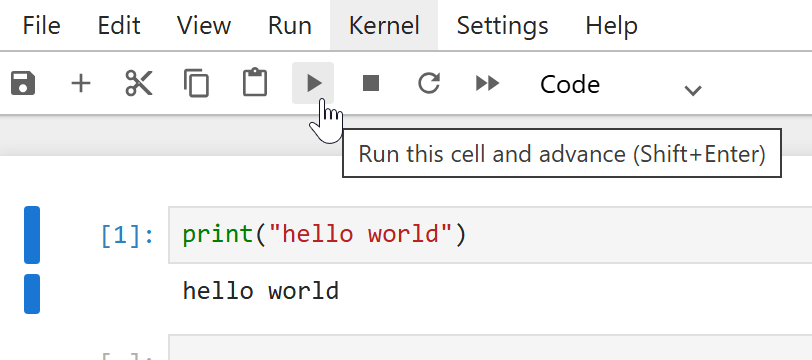
Fig. 2.6 Executing a code cell in Jupyter Notebook#
2.6.4. Markup Cells#
Jupyter Notebook is called a “notebook” because it functions like a digital notebook, a document that combines “live code, equations, visualizations, and text in a single, shareable file format. For non-code text presentation, we use Markdown cells. Markdown is a popular lightweight markup language that is a superset of HTML syntax, allowing for rich text formatting.
Let’s add a new cell by using the toolbar or the keyboard shortcut B. We can then use the Cell menu, the toolbar, or the key shortcut M to turn the highlighted code cell into a Markdown cell for notes. Note that Markdown cells are not executable, and we can format the text using Markdown syntax.
Markdown cells are useful for taking notes and support formatting such as headings, bold, italics, lists (itemized and enumerated), and even LaTeX for equations. You can use # to specify the heading levels (1-6):
# Heading Level 1 (H1)
## Heading Level 2 (H2)
### Heading Level 3 (H3)
For lists, use - and [number].; nested lists are also supported. For bold and italic, use double and single *.
2.6.5. Keyboard Shortcuts and Help#
Some keyboard shortcuts are handy when operating a notebook by streamlining your workflow.:
Shift+Enter: Runs the current cell and moves to the next.
A: add a new cell above the current cell
B: add a new cell below the current cell
DD: delete the highlighted cell
Z: undo
M: turn a code cell to Markdown cell
To show a list of shortcuts, go to the Help menu and choose “Show Keyboard Shortcuts” from the dropdown. The ‘Help’ menu also gives you access to documentation for libraries and the notebook itself.
2.6.6. Other Notebook Operations#
2.6.6.1. Saving and Exporting Notebooks#
You can save your notebook by clicking the save icon or pressing Ctrl+S. Jupyter Notebooks have an autosave feature that saves every two minutes.
To export your notebook, go to File > Download As and select your preferred format, such as .py (“Executable Script”) for Python scripts, PDF for documentation, or .html for web viewing.
2.6.6.2. Restarting and Interrupting the Kernel#
If you encounter an infinite loop or need to restart your Python environment, go to the ‘Kernel’ menu and select ‘Restart Kernel’ (0,0). This will reset the notebook’s kernel and stop any running code. You can also use ‘Interrupt’ (I,I) to stop a specific cell.
2.6.6.3. Shutdown and Deactivate#
To shut down Jupyter Notebook safely, you need to 1) shut down the notebooks kernels and close the tabs, 2) quit the Notebook server, and 3) deactivate the Python virtual environment.
Shutdown the notebook kernels and close the notebooks: First, save your work, then stop individual notebooks’ kernels from the Notebook UI (Kernel → Shutdown or Shutdown All Kernels). The can also be done from the Dashboard’s “Running” tab. After that, close the browser tabs.
Stop the Notebook server: Stop the server process at the Home page by doing File → Shut Down. Alternatively, this can be done by pressing Ctrl+C (confirm when prompted).
Finally, at the CLI, enter
deactivateto exit the active Python virtual environment.
2.7. Key Takeaways#
Jupyter Notebooks allow for interactive Python coding and note-taking in one environment.
Use PowerShell or Terminal to launch Jupyter Notebooks and navigate directories as needed.
Code cells execute Python code, while markdown cells are for formatted notes and documentation.
Keyboard shortcuts like Shift+Enter and A, B, DD to streamline workflow in notebooks.
Notebooks can be saved, exported, and kernels restarted or interrupted for troubleshooting.
2.8. Resources#
2.9. Bonus: Launch Jupyter FAST!#
To save you some typing, you may create aliases in Windows or macOS and launch Jupyter Notebook by just typing the aliases dsm, venv, and jn like:
PS C:\Users\[user]> dsm
PS C:\Users\[user]\workspace\dsm> venv
(.venv) PS C:\Users\[user]\workspace\dsm> jn
[I 2025-09-07 16:35:42.748 ServerApp] jupyter_lsp | extension was successfully linked.
[I 2025-09-07 16:35:42.757 ServerApp] jupyter_server_terminals | extension was successfully linked.
These aliases do the following for you:
dsmwill move your present working directory to your project folder dsm.venvwill activate your virtual environment.jnwill launch your Jupyter Notebook.
2.9.1. Windows#
In Windows, you may add aliases to your user profile to make your life with Jupyter a little easier. You add aliases to your profile. To check whether you have a profile defined already, do the following in PowerShell:
PS C:\Users\[user]> echo $PROFILE
C:\Users\[user]\Documents\WindowsPowerShell\Microsoft.PowerShell_profile.ps1
echo means print in the terminal. You should see the system-defined file path and the profile file name as above.
You need to edit the profile using Notepad or VS Code. If the profile exists already, the following command will open the *.ps1 file, and you copy and paste the ##### venv code ##### code block below to your profile, exit Notepad to save the profile. You then close all terminal sessions and exit PowerShell, open PowerShell again, and the aliases should work:
PS C:\Users\[user]]> notepad $PROFILE
Some systems have the $PROFILE environment variable defined, but do not have the profile path/folder and the profile file created. In that case, when you do notepad $PROFILE, you are trying to open a file that does not exist yet. You may therefore receive an error message or warning saying that the $PROFILE folder (WindowsPowerShell) or the profile file (Microsoft.PowerShell_profile.ps1) does not exist. If so, create them by doing the following steps:
First, check to see if the profile folder exists. If it does, you will be able to change directory into it (the folder is usually WindowsPowerShell or PowerShell, and it is under the user’s Documents folder):
PS C:\Users\[user]> cd $PROFILE\..                       ### **cd** into the folder
PS C:\Users\[user]\Documents\WindowsPowerShell>          ### ready to edit profile
If the profile folder WindowsPowerShell or PowerShell does not exist, you need to create it:
PS C:\Users\[user]> cd .\Documents\
PS C:\Users\[user]\Documents> mkdir WindowsPowerShell    ### or "PowerShell" depends on your system
PS C:\Users\[user]\Documents> cd WindowsPowerShell       ### cd into the profile folder
PS C:\Users\[user]\Documents\WindowsPowerShell>          ### ready to edit profile
After you are in the profile folder, use Notepad or VSCode to edit or create the profile. The profile (*.ps1) name may be different for different versions of Windows. Use the one you have when doing echo $PROFILE:
PS C:\Users\[user]\Documents\WindowsPowerShell> notepad Microsoft.PowerShell_profile.ps1
Notepad will pop up, and you then copy and paste the ##### venv code ##### code block below to the profile to create the aliases:
########## venv code ############################################################
##### dsm: change directory to introdsm ######
function CDIntroDSM {set-location ~\workspace\dsm\}	### create the function
New-Alias "dsm" CDIntroDSM				### create the alias dsm

##### venv: activate virtual environment #####
New-Alias -Name "venv" -Value .\.venv\Scripts\activate	### activate venv

##### j: start Jupyter notebook ##############
function JupyterNotebook {
  param(
    [string]$notebook = "notebook"
  )
jupyter $notebook
}
New-Alias -Name "jn" -Value JupyterNotebook
########## end of venv code ######################################################
2.9.2. macOS#
For Mac users, you can add the following lines to your ~/.bashrc file, and you should be able to use the alias to launch Jupyter Notebook fast. To edit the .bashrc file, at the terminal, type code .bashrc and VS Code will open the file for you to edit.
alias dsm='cd ~/workspace/dsm'
alias venv='source .venv/bin/activate'
alias jn='jupyter notebook'